
Photoshop Brushes Part 1

Anyone who has used Photoshop will know that it boasts some great illustration tools. Its basic set of brush tools allows you to airbrush very convincingly and if you care to dig a little deeper, you'll find the natural (and unnatural) media brushes that are provided in the package. With perseverance you can learn how to customise these tools and create your very own, resulting in virtually unlimited possibilities - such as the ability to paint with grass, cloak a creature in fur, paint foliage on a tree, airbrush wisps of smoke, snakeskin, glitter, barbed wire, etc etc.
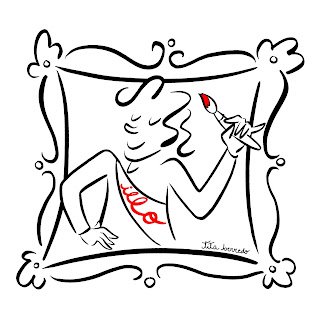
Take a look at the illustration that heads this article. Click to enlarge. Every mark you see on there has been created using a customised brush. I'm going to show you how to achieve this and I'll also give you the settings for some of those brushes, so that you can try them for yourselves.
First let's check out the most basic of brushes and get a grasp of their functionality. There are hard edged and soft edged brushes, and a variety in between. Typically, pencils are hard edged with no anti aliasing (ie. no soft edges)
(I find it useful to view my onscreen brush tip as 'normal size' or 'full size'. Then, as you're working, you see a ring indicating roughly the size of the tip you're dealing with. Much clearer than the standard cross-hair cursor. To do this, go to Photoshop preferences and choose 'Display and Cursors').
It's also useful at this stage to appreciate how important it is to use a graphics tablet and stylus such as Wacom, in order to master the natural look of each brushstroke. It's understandable for newcomers to be a little cautious at first, but try signing your signature on screen using a mouse. Then with a stylus. There's no contest.
With the brush tool selected, go to Window/brushes (or F5) which opens the 'Brush Palette'. Let's choose, for example, a fairly large, hard edged brush.
Picture 1 - shows our Hard Edged Brush stroked firstly with a mouse then with the tapered elegance created by using a stylus.

With the Brush Palette open it's here's where you can choose the size and style of brush from the drop down list. Make sure you take note of the mini palette called 'Brush Presets' as this is where all the brush alchemy takes place.
With 'Brush Tip Shape' selected, look at the bottom of the long palette and you'll see controls for brush spacing, brush size, softness and brush angle controls. To squidge the shape and angle of the brush (not terribly useful but you may as well know how) use the cross hair control.
All the changes you make get a mini dynamically updated window at the base displaying your current brush stroke.
Picture 2 - shows how the round brush has been squidged, more obviously apparent when painting in various directions.

As you paint with any brush, Photoshop spits out a series of dots of 'paint' at regular intervals. Lots of frequently emitted dots equals a solid line of paint. But if you slow down and control the frequency of the dots you'll get...a dotted line.

See Picture 3 Painting with regular dots at regular intervals is OK for regular graphic and decorative work, but if we're striving to get 'natural,' then we need to mix it up with a few random factors. Let's make our rows of squashed dots become random sizes.
Picture 4 - shows how 'Shape Dynamics' gives precise control over the min and max size limits of our dots, with 'Size Jitter' mixing them around between.

And rather than keep these random dots flowing in one continuous line lets disturb their flow.
Picture 5 -shows how 'Scattering' allows the dots to fall either side of our continuous line and using blue and green as foreground and background colours, we can also randomise the colour of our dots by using 'Colour Dynamics'.

All we've done here is ask for blue and green to alternate as each dot is painted (jitter at 100%) But if the jitter was set at 30% for example, we'd get various tones of blue through green as we 'sprayed' with colour. Additionally if we turned on 'Hue Jitter', we'd get complementary colours thrown into the mix. At its most extreme, we could paint with rainbow coloured dots.
The total control over this randomness, which affects the scattering, the intensity, the direction, the opacity, the purity of colours and more, can all be further influenced by the pressure sensitivity of our stylus. As you draw on the tablet, a change of pressure can alter most of these effects, as can the initial direction that you begin to paint in. It's bewildering, but now that you've got so far you ought to have a grasp of the fundamentals.
But who wants to paint with dots all the time? (latter day digital pointillists maybe) Because no matter how much we mix up these variations, our dots are still dots. But if we pick one of PS media brushes such as chalk, pastel, crayon, etc then it starts to look a whole lot more natural and very practical for 'real' illustration work.
Let's choose one of the chalk and pastel brushes. At the bottom of my list of brushes I've adapted and customised one of PS pastel brushes and re-named it 'best new pastel'. Picture 6 - If we zoom in and inspect a single brush 'dab' (created with a single click of the mouse) instead of a dot, it looks like this…

In the next article I'll show you how to create such a brush from scratch, but for now we'll experiment with my 'best new pastel'. As you can see in the brushstroke window, it's pretty useless until we start refining the control settings.
Picture 7 - after a few minutes experimenting, that very same brush now looks fairly convincing as a soft chalky pastel and uses colours that interact with each other.

Picture 8 - shows the settings I used to replicate the pastel effect of Picture 7

You'll notice that the control for 'Texture' is now also active. Via that Preset, there are 100s of possible textures to try out. The size of the texture along with its depth, plus subsequent pen pressure, can determine if the colours 'bleed' into the texture, sit on top of it or completely obliterate it.
Picture 9 - the final picture in part one of this feature shows our pastel brush laid over a few different textures of various sizes. The 'mesh-like' strokes top left are achieved by using 'Dual brush' controls which I'm not going to explain in this beginner article, but basically, it allows 2 brushes to mix and interact with each other.

You should now be able to explore any brush and make some reasonably useful marks with them. Once you have experimented and found your perfect pastel, or emulated your favourite Karismacolour pencil, charcoal, ball-point pen, etc etc, don't be surprised that it's not in your brush palette next time you open up PS. If you don't SAVE your new brush, I'm afraid all the experimenting and refining has been for nothing. So it's crucial to regularly go to Brushes then, using the tiny right-facing arrow top right of the palette, you'll see a drop down list. From that list choose 'New brush preset' and name and save your new creation.
Next time we'll create our own unique brushes and see how they can be, and have been, used in children's book illustration.


This looks incredibly useful to a novice like myself. Thank you! I'm going to print it out for reference.
ReplyDeleteThis is brilliant Paul - it makes me want to have a go!
ReplyDeleteI have managed to get some pretty convincing pencil effects but takes a lot of playing around. Great guide Paul lots of useful stuff here look forward to more :-)
ReplyDelete